Capturing Robocopy Metrics: Scanning the Log File.

[This is Part One of a multi-post series on how my team is combining Robocopy, PowerShell, SQL, and Cold Fusion to track the metrics we generate when we use Robocopy for replicating data within our file server environment.]

Good day All

This year in my workgroup we are focusing on capturing metrics on the tasks that we do, and one thing that we do a great amount of is file replication.  Whether we are replacing a server, and need to move all of the data to another server, or are simply load balancing the available space on a server’s data disks, we use Robocopy for the data replication.  Robocopy has a host of features that make it our default copy tool, but the one that relates to our discussion today is its logging capability.

As stated above, part of the metrics focus for the year is to capture the amount of data the we are replicating.  The primary method for capturing replication metrics is to parse the Robocopy logs we generate when we perform our daily replications.  Using Regular-Expressions, and PowerShell, this blog post will examine a method for extracting the text needed for our metrics.  The script file being discussed in this post is called Scan-RobocopyLogs.ps1; it and the test Robocopy log file we are scanning can be downloaded from my Box folder here.To get started here is an image of a Robocopy log file.  In this particular screenshot very little new data was discovered, so the amount of files shown as moved is pretty small.

Robocopy_LogFile_Totals
Fig. 1: Robocopy Log File


A few notes on the above image:

  • I have renamed the  names of the servers in the text file to keep anybody in my company from getting nervous. So it is not an original Robocopy output file, but the values are still valid.
  • You will see a total of four files marked as either ‘New File’ or ‘Newer’.  On a busy day, or a first time replication, many thousands of files could be potentially displayed.  This is an incremental replication, and only those files that have been added or changed are actually copied.
  • Robocopy summary information is contained in the red rectangle that I have overlaid onto the image of the log file.  This red bordered area will be the primary focus of the metrics parsing.

In the red rectangle the data is presented in rows called Dirs, Files,  Bytes, Times, Speed, and Ended.  Also you should notice several columns labelled Total, Copied, Skipped, Mismatch, Failed, and Extras.  Notice the number of Copied-Files is 4, and the number of of Skipped-Files is 30916. If any files had not been successfully replicated they would  have been listed in the Failed-Files number.  So that is the general description of the log file.  Now on to the parsing.

For each Robocopy log file that is scanned a data object will be created.  The data object will be used to hold the various metrics values that we capture using Regular-Expression matching.  He is a screenshot of the data object properties:

Metrics Object Properties
Fig. 2: Metrics Object Properties

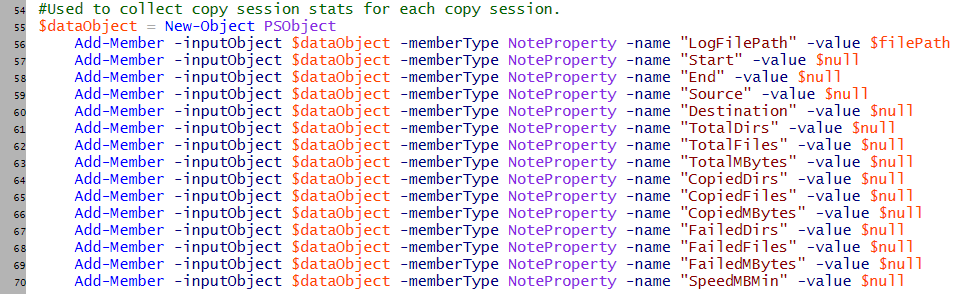
Notice that we are capturing a wide variety of data from the text in the log file.  As we convert the data into objects it becomes much more useful than plain text: now we can perform mathematical functions, and use the data to feed database tables. So how do we capture and convert this text from a log file into objects?  Regular-Expressions!

A lot of information is available on Regular-Expressions (known here after as RegEx).  There are many methods to perform the type of RegEx filtering we are doing here.  As I write scripts for our team at work, I try to be verbose in the way I do things to make the script readily understandable for all team members. So, the following can be done in a more succinct manner, but I chose this implementation for the sake of clarity.  If you downloaded the file previously using the Box link provided above, you can follow along with this general line by line discussion.

Lines 1 – 10: The parameter input for the script. Only 1 parameter is used, -FilePath provides the full path to the log file being scanned.

Lines 15 – 42: Set up the local folder values, and setup the error logging mechanism.

Lines 45 – 51: Set up global variables for use in the script.

Lines 53 –  69: Create an object to hold the values parsed from the text read from the log file.

Lines 71: Test to see if the path to the log file is valid.

Lines 73 –  92: A function to clear the contents of the parsed text data object.

Lines 94 –  110: Set the values in the data object to ‘Logfile Corrupted’. This will be used when a log file has been found to be  badly formatted.  This will occur when a log file is being written to simultaneously by multiple Robocopy sessions.

Lines 112: Read the contents of the log file, and store them into $roboCopyStr.

Lines 113 –  276: Loop to read through each line ($line) of the value stored in $roboCopyStr.  When the text in $line matches various RegEx statements it will be assigned as a value for a property in the data object.

The following table is a summary of the RegEx matches used in this script.  They are accompanied by an example of the type of text they are looking for, and the variable within the script that is affected. The ‘Regular Expression’ column in Table 1 should be compared to Lines 113  – 276 of the script.

Regular Expression Matched Text Affected DataObject Property
‘^\s+Started\s:.*’ Started : Sun Feb 08 21:00:01 2015 $dataObject.Start
‘^\s+Source\s:.*\\\\.*\\[A-Z]\$.*’ SourceServer\S$ $sourceServer / $sourceDrive
‘^\s+Dest\s:.*\\\\.*\\[A-Z]\$.*’ TargetServer\T$ $targetServer / $targetDrive
‘^\s+Ended\s:.*’ Ended : Sun Feb 08 21:05:53 2015l $dataObject.End
‘^\s+Source\s:.*’ Source : \\SourceServer\S$\… $dataObject.Source
‘^\s+Dest\s:.*’ Dest : \\TargetServer\T$\… $dataObject.Destination/td>
‘^s*Replicating_SysAdmin’ Replicating_SysAdmin: PP1071 $replicatingSysAdmin
‘^\s+Dirs\s:\s*’ Dirs : 3217 1 3216 … $dataObject.TotalDirs = $dirs[0]
$dataObject.CopiedDirs =$dirs[1]
$dataObject.FailedDirs =$dirs[4]
‘^\s+Files\s:\s[^*]’ Files : 30920 4 30916 … $dataObject.TotalFiles = $files[0]
$dataObject.CopiedFiles = $files[1]
$dataObject.FailedFiles = $files[4]
‘^\s+Bytes\s:\s*’ Example: Bytes : 1.607 g 0 … $dataObject.TotalMBytes = $tempByteArray[0]
$dataObject.CopiedMBytes = $tempByteArray[1]
$dataObject.FailedMBytes = $tempByteArray[4]
‘^\s+Speed\s:.*min.$’ Dest : \\TaargetServer\R$\Pl… $dataObject.Destination

Table 1: RegExs and Their Affect in This Script.

Line 278: When each line of $roboCopyStr has been read the For loop is exited. The each parsed line of the read text that has matched  one of the RegEx expressions has been stored into the data object $dataColl, or one of the other variables: $sourceServer,$sourceDrive,$targetServer,$targetDrive,  and $replicatingSysAdmin.

Here is a sample run of the script:

.\scan-RobocopyLogs.ps1 -filePath .\150208_TargetServer_S_MSO_R.TXT 

Scan-RobocopyLogs.ps1 Run_Example
Fig. 3: Scan-RobocopyLogs.ps1 Run_Example

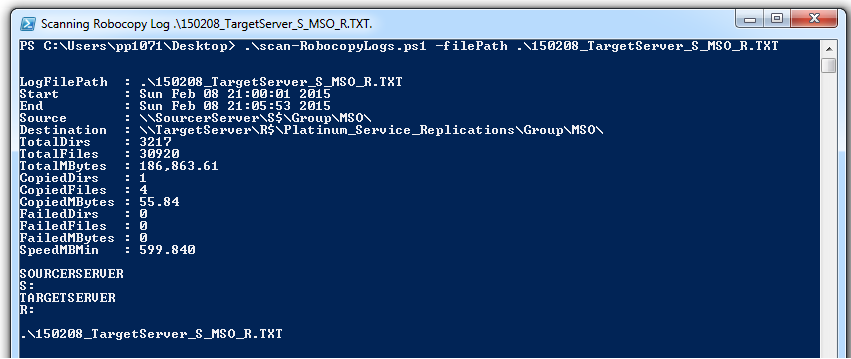
Looking at the output of Fig 3, you can see that when we run the script it provides several valuable pieces of information that were parsed from the log file. The output from this script is intended to be used as the return data from a call in another script.

That is all for now. Up next will be:

“Capturing Robocopy Metrics: Setting Up the Replication Log”

Thank you for reading.

Have a great day.

Patrick

Advertisement

Capturing Robocopy Metrics: Overview

Good day All

Today I am feeling ambitious, and I would like to launch a multi-post series on some of the work we are Christen_the_Seriesdoing this year.  Part of our requirements for the year are to capture the metrics that we create for the daily tasks that we do.  My first effort toward that end has been to create a process for tracking the amount and sizes of files that we move as part of our daily load balancing or server migration replications.

I have had good success with this endeavor, and wanted to share the results with the loyal followers of TheScriptLad.com. I am presenting my results in the following sequence:

Capturing Robocopy Metrics: Scanning the Log File. Using regular expressions to parse a Robocopy log file; doing this to extract the amount of data moved, and to count any errors to indicate any replication failures.

Capturing Robocopy Metrics: Setting Up the Replication Log. This is will be a look into the Robocopy template that we use. This is something that we have tweaked and nudged over the years, and I think we have a great replication process in place.

Capturing Robocopy Metrics: Uploading the Results to a Database. Take the results from the Robocopy log files, and add them into an SQL database.

Capturing Robocopy Metrics: Displaying the Results with Cold Fusion.  The final output. Display the Robocopy replication metrics in a Cold Fusion page. This will work with a standard HTML page, but we are applying the results to a Cold Fusion server.

I’m looking forward to sharing my results with you, and welcome any comments and suggestions you would like to present.

Have a great day,

Patrick

Continual Ping of a Computer with an Alert When Successful.

Good day.
Yesterday was a Friday, and it had been a full, but good week of server fun. I was driving home from dinner, and the last thing I wanted to do was stare at my computer screen. Then the on-call page arrived. A server in California was down because of a power outage at the server’s location. While I could do nothing about the power outage, I was responsable for letting our outage management team know when the server was back online, and our server’s shared resources were available.

Well I start the classic DOS command “PING SERVERNAME -T”, and then watched as the time out notices started to scroll up the screen. The power outage was expected to last anywhere from 30 minutes to several hours, and I really didn’t want to watch the computer while the pings kept scrolling on the screen. What I needed was for the ping to continue, and then stop and notify me with an audible alert when the ping was coming back successfully, and the server was back online. This would allow me to enjoy my Friday, and keep an ear tuned to the alert from my PC in the next room.

Some quick Google research got me what I needed, and I was able to create a quick and simple function to make that happen. I started the function, and was able to walk away. Two hours later, I was alerted, and was able to notify our outage management team of the server status, and the fact that the resources were available.

It is now Saturday morning, and I liked the function so much I have polished it up, and enhanced it just a bit. The function name is:
Test-ConnectWithAlert
I have added headers to the function, so to see the syntax of the function type the following:

get-help Test-ConnectWithAlert  -Examples

pp1071_1377176449036

From the screen shot you can see that there are two parameters: -ComputerName and -Voice

  • -ComputerName: Default is LOCALHOST. This is the name of the computer you want to “ping”. Put a computername here
  • -Voice. If used this will give a Text-to-Voice alert instead of an audio tone.  I have a Cepstral voice installed, so the voice is more pleasant than the default MicroSoft voice.

For both examples that I am showing in the following screenshots I am using my LOCALHOST, but there won’t actually be a time out delay.

pp1071_1377176449127

First Example: Test-ConnectWithAlert -ComputerName LOCALHOST

pp1071_1377176449141

Second Example: Test-ConnectWithAlert -ComputerName LOCALHOST -voice


Q: So what is actually happening here?  There are three areas of interest.  The first one occurs at line 21.  This Do Loop repeats untill the Test-Connection cmdlet commands  back with a TRUE value.  That occurs when the pinged computer is once again pingable.  Once that condition is met then the script will continue on, and notify the user of the computer’s status.

pp1071_1377533498931

DO Loop: Repeats until the target computer is found to be online.

Also of interest are the two responses to the two methods of notification.  The first method uses a standard WAV file.  I have used chime, but any valid file can be used, including one that you create.  I found the method to play the WAV file here: playing-sounds-in-powershell.html . It is an old post, but a good one, and it details several methods for playing WAV files.

pp1071_1377533498951

WAV Notification: Repeats until the User Responds.

The second notification method uses Text-to-Voice to read a predefined text statement, and convert it to voice. There are some standard Windows voices that you can use, but I have purchased a voice from Cepstral (http://www.cepstral.com/).  I use a lot of voice  notifications for script completions so to me it was worth the slight expense of the voice. I go into more detail on text to voice in other posts, but in the following screen shot you can see generally what is going on .

pp1071_1377533498981

Text-to-Voice Notification Do Loop: Repeats until the User Responds.

 The PS1 file containing the function can be downloaded here:  Test-ConnectionWithAlert.PS1 or you can get it from my Box.Net widget at the bottom of this page. Look for the folder called “Test-ConnectionWithAlert”.  I have commented the various parts of the script with what I think is helpful information, and links to other resources.

Thanks for reading. Let me know if you have any questions or comments.

Have a good day,

Patrick

Regular-Expressions

Recently I was asked by my management team to use PowerShell to help with some text searches in a large collection of files, about 15,000 log files generated within our SharePoint system.  The SharePoint team was dealing with an issue and needed to capture email address info related to that issue.  The text they wanted to search for was ‘collabmail’, and then return what was to the left of the @ symbol.

My manager has been working with PowerShell in an attempt to keep his tech skills up to date, so he had already found out how to find the data in the files using the Select-String cmdlet.  Here is what he had so far:

select-string -path *.eml -pattern ‘collabmail’.

Which resulted in the following screenshot of data being returned:

So that was working fine.  I recommend he do two things.

  • Select specific properties from the Select-String cmdlet to make the result more readable.  In this case capturing just the file name and line properties would be useful.
  • Use a ‘Regular Expression’ to filter just the info he needed from the returned line of text from each line.  I will use the term Reg-Exp to describe Regular-Expressions below.

For the Select-String cmdlet here is what I recommended he use:

$allResults = Select-String -Pattern ‘@collabmail’ -Path *.eml | select line, filename


Capturing the result from the Select-String cmdlet as the variable $allResults allows us to us a Reg-Exp to filter just the data we want instead of the entire line of text. The above screenshot shows the results from a couple of sample .EML files that I used for testing the  Select-String cmdlet.  Notice the $allResults is an array containing the found text from each file. The two properties of the array are Line and Filename.

Here is where the Reg-Exp comes into the process:

foreach ($result in $allResults){

                [string]$result -match ‘\w+@collabmail’ | Out-Null

We will step through the $allResults array, and for each of its members we will apply the Reg-Exp filter. This will strip off all of the extra data that we don’t need.

Remember my manager only wanted the part of the found email address before the ‘@’ symbol?  So how do we get just the name of the resulting email address?  The following code takes care of that by modifying the returned value from the Reg-Exp:

foreach ($result in $allResults){

                [string]$result -match ‘\w+@collabmail’ | Out-Null

    #We want only the data before the @, so this section will split the result into two parts and keep the first part.

    $emailAddress = $matches[0]

    $emailAddress = $emailAddress.split(‘@’)


Here is how the resulting text is sent out into the resulting CSV text file.

$emailAddress = $emailAddress.split(‘@’)

                $fileName = [string]$result.Filename

                $output = $Filename + “`t” + $emailAddress[0]

                Write-Host $output

                Out-File -FilePath .\scanresults.csv -InputObject $output -Append

PowerShell has the ability to capture data as objects to contain data.  The resulting object can be sent to a CSV text file using the Export-CSV cmdlet, but in the case where the size of the resulting data set is unknown I like to output each iteration of a data capture into the output text file.  I’ve had situations where a scan of log files resulted in huge data sets (hundreds of thousands of rows).  The resulting objects I was working with in PowerShell would consume all available memory resources and result in a system crash; nothing permanent just a reboot.  Outputting each line of the data set as it arrives keeps system resource usage to a minimum.

Here is the screenshot from the sample output CSV file:

The full text of the script can be found here: 

EML-Scan.ps1

This script uses a really simple Reg-Exp, but more information can be found on this useful tool quickly using Google.  Here is a good starting point that can be used for Regular-Expressions in general and specifically as they apply to PowerShell:

http://www.regular-expressions.info/powershell.html

Find Co-Workers of an Account Listed in Active Directory

When managing user accounts in MS Active Directory one of the frequent request we get is to relocate the Home Directory for an employee.  There could be a number of different reasons for this,  but some common causes for the request are:

  • The relocation of an employee to a new city or work location.
  • A Home Directory has grown too large and needs to be relocated for diskspace load balancing.
  • The Home Directory folder is not located in a location that provides fast enough access speed across the WAN.

When we are relocating a Home Directory one of the common things we need to know is What server provides employees the best access speed for the new location of the requesting employee“?  One easy way to answer this question is by determining what server the employee’s new or current Co-Workers are using.  In this case Co-workers means those employees that report to the same manager.

What is a good way to find the homedirectory of an employee and his peers if you are not familiar with their workgroup?

The following PowerShell function provides a solution to that question.

<#
.SYNOPSIS
This script is used to get detailed information on a user account found in Active Directory.
.DESCRIPTION
This script is used to get detailed information on a user account found in Active Directory.
The result can be sent to the output screen and the Out-GridView cmdlet.
Get-QADUser is required; part of the Quest AD management software.
Found here: http://www.quest.com/powershell/activeroles-server.aspx

.PARAMETER <paramName>
UserID – The account that will searched in the domain detailed by -Domain.

.EXAMPLE
Get-UserInfo AA9999
This will search the default domain for an account using the standard ATT account type. The default domain is ITServices.
.EXAMPLE
Get-UserInfo “LastName, FirstName MI”
This will search the default domain for an account using the Full Display Name. The default domain is ITServices.

#>

#This function will provide a work of employees that work with an employee. They all have the same manager.
#Name, displayname, homedirectory, and email-address are returned.

function get-coworkers([PSObject] $UserID) {
if ((Get-QADUser $userID | select-object manager) -ne $null){

Get-QADUser -Manager (Get-QADUser -Identity $UserID | select-object manager).manager | select-object name, displayname,homedirectory | sort-object homedirectory | ft -AutoSize

}

else {

write-host “$UserID was not valid, or no manager was listed for the account.” -foregroundcolor red

}

}

get-coworkers $UserID -UserID $Args[0]
#End

Here is a sample of the function being run using my ATTUID as the input:


Sample of the Get-Coworker function being run using my ATTUID as the input (Some Output Obscured)

Another simple way to run it is by applying the “Full Display Name to the function input:


Sample of the Get-Coworker function being run using my Full Display Name as the input (Some Output Obscured)

If you apply an account to the function, or the account does not have a manager applied to it you will see the following error:


Sample of the Get-Coworker function being called on an invalid AD account(Some Output Obscured)

To download the full text of this script please go here:  Get-CoWorkers.PS1

Find Users Actively Connected to a Share

The work I do for AT&T deals extensively with performing data migrations; moving user and group data from one server to another.  To make the data transition easier for the active share users I send emails to them indicating when a share is going to move, and what its new location will be?

Q:How do I capture that active user information?

A:  I use a WMI query using the class Win32_ServerConnection.

With Powershell you can easily query a remote server to find out what accounts are connected to all shares, or a specific share.

One of the very nice things about Powershell is that you can create a “one-liner” to grab the information quickliy.  This would be used  as a quick reference.  Here is an example of a one liner to find all of the employees connected to server ServerBravo1

Get-WmiObject Win32_ServerConnection -ComputerName ServerBravo1 select username, sharename, computername | sort sharename | Format-Table -AutoSize

Here is the break down of that command:

Get-WmiObject Win32_ServerConnection: Performs the WMI query using the Get-WMIObject cmdlet.

-ComputerName ServerBravo1: Runs the query on the remote server ServerBravo1.  If the -ComputerName property is excluded then the command is run on the local computer.

selectusername, sharename, computername:  This determines which properties are returned from the query.  I find these to be the most useful properties, but there are a lot more that can be returned.

Here is a list of the properties that could be useful:

Name                           MemberType
—-                                ———-
ActiveTime               Property
Caption                       Property
ComputerName      Property
ConnectionID          Property
Description              Property
InstallDate               Property
Name                          Property
NumberOfFiles       Property
NumberOfUsers     Property
ShareName              Property
Status                         Property
UserName                Property

sort sharename: This sorts the results based on the value of the ShareName property.

Format-Table-AutoSize: This formats the output in columns.  The -autosize option places the columns in a nice compact presentation.  Other output options include format-list, and my personal favorite out-gridview.

The one-liner is nice but you have to type the full text each time.  Since I use this command so much, I prefered to make a function where I can type the function name followed by a server name.  The required typing is a lot less for each use, and you don’t really need to remember the specific property names.

Here is how that funtion would look:

Function to Find Active Share Users on a Server

function get-ShareUsers

{

<#

.SYNOPSIS

Determine which shares are actively being used by employees.

.DESCRIPTION

This provides a live time view of shares currently being accessed by employees. The output can be to the Powershell screen, the out-gridview window, a CSV file, or all of the above.


.PARAMETER <paramName>

ServerName – Used to determine the server to scan.

GridView – Enables the output to the gridview.

Export – Enables the output to a CSV file using the export-csv cmdlet.

.EXAMPLE

get-ShareUsers S47715C014001

Description

———–

This command scans a server called S47715C014001 for active share users. The result is sent to the Powershell screen.

.EXAMPLE

get-ShareUsers S47715C014001 -Gridview

Description

———–

This command scans a server called S47715C014001 for active share users. The result is sent to the Powershell screen, and to the out-gridview window.

.EXAMPLE

get-ShareUsers S47715C014001 -Gridview -Export

Description

———–

This command scans a server called S47715C014001 for active share users. The result is sent to the Powershell screen, to the out-gridview window, and to a CSV file called S47715C014001 _Share_Users.csv

#>

[CmdletBinding()]

Param

(

#First parameter

[parameter(Mandatory=$true, #Makes this a required parameter. The user will be prompted for this item if it is not provided.

ValueFromPipeline=$true)] #Allows the server name to be “Piped” into the function.

[String[]] $ServerName, #The name against which to run the query.

#Second parameter – Sends the output to the out-gridview display.

[switch] $Gridview,

#Third parameter – Sends the output to a CSV file for later used.

[switch] $Export

)


#Default output to the Powershell interface.

Get-WmiObject Win32_ServerConnection -ComputerName $ServerName | select username, sharename, computername | sort sharename | Format-Table -AutoSize

if ($Gridview -eq $true) #Use this switch if you want to output to the Out-Gridview window.

{

Get-WmiObject Win32_ServerConnection -ComputerName $ServerName | select username, sharename, computername | sort sharename | Out-GridView -Title “$computername Share Users”

}

if ($Export -eq $true) #Use this switch if you want to output to a CSV file.{

[string]$filename = $ServerName+ “_Share_Users.csv”

Get-WmiObject Win32_ServerConnection -ComputerName $ServerName | select username, sharename, computername | sort sharename | Export-Csv -Path $filename -NoTypeInformation

}

}

A few final comments:

  • To make this function available all of the time when you are using PowerShell, paste the function into your PowerShell profile document.  When you do that it will load each time you start PowerShell.
  • Once it is loaded into your PowerShell session, you can find help on this function by typing the following in the PowerShell command line window:

help get-shareusers -Full

This will give examples of how to use the function, and also give detailed information on each of the parameters.

  • Finally, to make it easier to use this function, I have uploaded the text of the script here at my Google page:

Get-ShareUsers.ps1

I hope this is a helpful utility for you.

Please let me know if you have any questions about this, or any of my other posts.

Have a good day.

Patrick

How to Run a PowerShell Script from Batch File

A friend was lamenting to me recently that there was an aspect of Powershell that he found annoying. He didn’t like the fact that you had to open a PowerShell command line window to run a script. Well guess what, dear friend – you don’t really need to do that!

Purpose:

This blog entry details the quick and easy method for running a PowerShell script from a shortcut on your desktop. To get started let’s have a quick little script on hand to test how this works.

1. Open notepad, copy the below text into it, and save it as PowerShellTest.ps1. Keep track of where you save it.

$name = Read-Host “What is your name?” #Get name from CLI.

$quest = Read-Host “What is your quest?” #Get quest fromCLI

$windowObject = new-object -comobject wscript.shell #Create windows message box object.

$output = $windowObject.popup(“Hello $name.`nYour quest sounds exciting!”,0,”Quest: $quest”,1) #Display the message.

Now, here is how you can open that script in Powershell by just clicking on an icon.

2. Where ever you saved PowerShellTest.ps1, right click and select New Document.

3. Name the file “PowerShellTest.cmd“. The cmd is used to assign a file extension type of command to the text file. This lets it operate as an executable file.

4. You will see the following popup message:

Select “Yes” to confirm.

5. Now right click the PowerShellTest.cmd file that you just made, and select “Edit“. This will open up the CMD file in Notepad, and allow you to finish this process.

6. Inside of the cmd file, type in “Powershell.exe”, a space, and then the name of the PowerShell file you made in step 1.

Notice that I added “.” to the front of the file name. This is required by Powershell to help indicate that this is a file, and not a variable. It is called “Dot Sourcing” in Powershell.

The actual text I used is: Powershell.exe .PowerShellTest.ps1

7. Save and then close the CMD file to continue.

8. Now, to test the final product, double-click on the CMD file that you made in steps 3 and 4. You will get the following result:

You are going to be prompted for your name, and your quest. Just make up something dreadfully clever for each. Once you type the text, press Enter for each line. After your final entry a message box is displayed, indicating the the script has completed.

So, there you go. You were able to run a PowerShell script by simply clicking on a CMD text file. I generally store the CMD file with the PowerShell script file to make them quickly accessible.

Summary:

While this program is simple, it does highlight the method for opening a PowerShell script from Windows Explorer. Incidentally, it shows the method to prompt a script user for input, and also shows how to display a Windows message box output.

As always, let know if you have any questions or comments.

Thank you, Patrick

Getting the Directory Size on Remote Servers.

Greetings Kenny

In regards to your question on scanning for a directory size…

I think I would use a different approach for finding the results of a remote directory size.  A good choice for this is the “Get-ChildItem” cmdlette.

The DOS version of this is simply the DIR command.

Unlike VBScript, Powershell doesn’t have a direct method for getting a folder size, but there is a work around. You can use the “Measure-Object –Sum” cmdlette and properties to calculate the data.

Let’s say I want to calculate the size of the c:\temp directory on my local computer.

The command would look like this:

We are creating a resulting PowerShell object with the properties of count, average, sum, etc.

We are only assigning a value to Sum.

So how would that be used to calculate the size of a folder on a remote server?  Instead of using “c:\temp” you could put in any path, including a URL.  Here is the conceptual example.

I am using –recurse to check all subfolders, and –force to check hidden and system files.

Get-ChildItem \\servername\c$\temp -recurse -force | select Length |Measure-Object -Sum length

In your comment you indicated that you wanted to check the size of E:\VM on multiple servers.  You could pull the server name out of a text file.  The text file could be called server.txt

Assuming I put the file containing my list of servers to check at c:\servers.txt, the command could like this.

$path = “\\$serverName\E$\VM

foreach ($serverName in (get-content c:\servers.txt))

{

       $dirSize = Get-ChildItem $path -recurse -force | select Length  |Measure-Object -Sum length    

       $dirSize #Output the result to the screen.

}

That works, but the result is kind of awkward as output is in bytes instead of MB.

We can dress this up by applying formatting to the result, and converting to MB.

$dirSize = Get-ChildItem $path -recurse -force | select Length  |Measure-Object -Sum length

$dirSize.sum = $dirSize.sum/1MB

$finalResult = “{0:N2} MB” -f $result.sum

Now the resulting directory size would be in MB.

One more way to improve this would be to collect each iteration of the “foreach” cmdlette, and put into an object so that would could get the result into a CSV file, or maybe output to the out-gridview cmdlette.

Here is the result of all that code..

$dataColl = @()#Makes an array, or a collection to hold all the object of the same fields.

foreach ($serverName in (get-content c:\servers.txt))

{

       $path = “\\$serverName\e$\VM

       $dirSize = Get-ChildItem $path -recurse -force | select Length  |Measure-Object -Sum                   length

       $dirSize.sum = $dirSize.sum/1MB

       $finalResult = “{0:N2} MB” -f $result.sum

       $dataObject = New-Object PSObject

       Add-Member -inputObject $dataObject -memberType NoteProperty -name “ServerName” -value                 $serverName

       Add-Member -inputObject $dataObject -memberType NoteProperty -name “Dir_Size” -value                   $finalResult

       $dataColl += $dataObject  

       $dataObject

}

$dataColl | Out-GridView -Title “Remote Directory Scan Results”

$dataColl | Export-Csv -noTypeInformation -path c:\temp.csv

Here is the resulting “Out-GridView”.  I’ve smudged out the actual server names I used.

The resulting output is also available in the temp.CSV file at the root of my C: drive.

Depending on your number of servers, network, and folder sizes this could take a while to run.  I would save it to a script and run it from a separate Powershell window so you don’t have to stare at it while it runs.

Please let me know if this helps, and if you have any further questions.

Have a nice day.

Patrick

Get-DriveSpace on One or Multiple Computers

One common administrative task is to find the  available disk space on a server.  The standard methods to do this are connecting to the computer remotely to verify disk space, and using VBScript scripting to gather the data.  But there is a better way…

With Powershell’s extensive use of WMI and the “piping” options, a very useful one-liner can be used to retrieve the disk space for one or more servers.

Here is the WMI property that we will be using: Win32_LogicalDisk.

To find the disk space available for one computer you would use this one-liner:

get-wmiobject Win32_LogicalDisk -computername Server001 | select __server, Name, Description, FileSystem, @{Label=”Size”;Expression={“{0:n0} MB” -f ($_.Size/1mb)}}, @{Label=”Free Space”;Expression={“{0:n0} MB” -f ($_.FreeSpace/1mb)}} | out-gridview -Title “Disk Space Scan Results”

Lets take a look at the different sections of that one-liner.

get-wmiobject Win32_LogicalDisk -computername Server001 |

This is the standard cmdlette for accessing WMI in Powershell.  The number of available WMI classes is quite extensive.  In the above example, -computername would be followed by a valid computer name. The output of that is piped  into the  Select-Object cmdlette.

select __server, Name, Description, FileSystem, @{Label=”Size”;Expression={“{0:n0} MB” -f ($_.Size/1mb)}}, @{Label=”Free Space”;Expression={“{0:n0} MB” -f ($_.FreeSpace/1mb)}} |

Select-Object, in this one-liner aliased as select, allows us to choose which properties of the returned query we want to use.  By default the Win32_LogicalDisk class provides us with the following properties:

DeviceID     : C:

DriveType    : 3

ProviderName :

FreeSpace    : 10997723136

Size         : 21478666240

VolumeName   : C_Drive

We do two things differently with our one-liner. First we grab an extra property that is always available, but not always needed.  We are requesting the “__server” property.  This will be useful when we put everything in columns later on, and really useful when we are asking for the disk space on multiple servers.

The second thing we are doing differently is to apply formatting to the “Size: Property and “Free Space” property. If you notice above the output is in bytes.  We are use to thinking of hard drives in MB or GB, not bytes.  That is way too weird.  So we are going to created two calculated properties.  There is a calculated property for “freespace” and “size”.

The calculated property is much simpler than it might first appear. To specify a calculated property we need to create a hash table; that’s what the @{} syntax does for us.  Inside the curly braces we specify the two elements of our hash table: the property Label (in this case Size or Free Space) and the property Expression (that is, the script block we’re going to use to calculate the property value).  The Label property is easy enough to specify; we simply assign a string value to the Name, like so:

Label=”Size” and Label=”Free Space”

And, believe it or not, the Expression property (which is separated from the name by a semicolon) isn’t much harder to configure; the only difference is that Expression gets assigned a script block rather than a string value:

Expression={“{0:n0} MB” -f ($_.Size/1mb)}} and Expression={“{0:n0} MB” -f ($_.FreeSpace/1mb)}} are the expressions we are using.  So what actually is going on here?

Using .NET to Format Numbers in Windows PowerShell

Powershell doesn’t have any built-in functions or cmdlettes for formatting numbers. But that’s OK; we don’t need any built-in functions or cmdlettes. Instead, we can use the .NET Framework formatting methods.

The heart-and-soul of our command is this little construction: “{0:N0}”. That’s a crazy-looking bit of code to be sure, but it’s also a bit of code that can easily be dissected:

The initial 0 (That’s a zero)  (the one that comes before the colon) represents the index number of the item to be formatted. For the time being, leave that at 0 and everything should work out just fine.

The N represents the type of format to be applied; in this case, the N is short for Numeric. Are there other types of formats we can apply? Yes there are, and we’ll show you a few of those in just a moment.

The second 0 (the one after the N) is known as the “precision specifier,” and, with the Numeric format, indicates the number of decimal places to be displayed. In this case we don’t want any decimal places, so we set this parameter to 0. Suppose we wanted to display three decimal places? No problem; this command takes care of that: “{0:N3}” -f $a. Run that command and you’ll end up with output that looks like this: 19,385,790,464.000.

That’s about all we have to do; after specifying the format type we tack on the –f (format) parameter, then follow that by indicating the value we want to format $_.FreeSpace and $_.Size.

In our one-liner we are dividing the number variables $_.size and $_.freespace by the Powershell constant mb. We could do kb or gb as well. It depends what output you want to see.

For a more extensive discussion on .net formatting, please go here:

http://technet.microsoft.com/en-us/library/ee692795.aspx

http://msdn.microsoft.com/en-us/library/dwhawy9k.aspx

This is the source I used for much of this information.

The final section of the one-liner outputs the results to the Out-Gridview window.  I have modified the “title” property so that it shows what we are attempting to do with the query.

| out-gridview -Title “Disk Space Scan Results”


The above information details how to find the disk space for one server.  Because the “computername” property of the Get-WmiObject cmdlette will accept an array, or a single string.  This allows us to check mutiple servers with the same one liner.  This can be done two ways.

In the first method, the computer names can be directly type into the one liner:

get-wmiobject Win32_LogicalDisk -computername server1, server2, server3

In the second method the computer names can be read from a test file using the get-content cmdlette.

get-wmiobject Win32_LogicalDisk -computername (Get-Content c:\temp\computers.txt) `

select __server, Name, Description, FileSystem, @{Label=”Size”;Expression={“{0:n0} MB” -f ($_.Size/1mb)}},`

@{Label=”Free Space”;Expression={“{0:n0} MB” -f ($_.FreeSpace/1mb)}}`

| out-gridview -Title “Disk Space Scan Results”

I prefer the second method because you can gather the disk information on many servers very quickly.

Please let me know if you have any questions about this procedure.  I would be glad to explain anything, or answer any questions.

Thanks,

Patrick

Test Multiple Network Locations with Test-Path

Frequently we relocate a large number of employee home folders in bulk and we need to verify that the move was successful, or we want to test the validity of a large number of network shared folders. This utility does that utilizing the Powershell test-path commandlette.

If you want a basic understanding of how the test-path commandlette works, type this in your Powershell console window:

get-help test-path –full

Here is a general description of what this script utility, Test-Paths.ps1 does:

.SYNOPSIS

This script will test the validity of paths that are contained in the paths.ini file. Output is generated to a CSV file, and to Out-GridView.

.DESCRIPTION

The targets of the test-path command are pulled from the “paths.ini” file that is collocated with the test-paths.ps1 file.

Each target is tested using the Powershell test-path commandlette. Results are stored along with the path name in two output methods.

out-gridview and filename.csv

.PARAMETERS

-nogridview: Prevents the script from generating the Out-GridView window.

-noexport: Prevents the script from generating the exported CSV file.

-outfile filename.csv: Use an alternative name for the output file. CSV extension is best. The default if this switch is not added is testpathresult.csv.

.EXAMPLES

This will give two outputs. A file named testpathresult.csv and the out-gridview window:

.\test-paths.ps1

This example will give no out-gridview window, but will save a CSV file named patrick.csv:

.\test-paths.ps1 -nogridview -outfile patricks.csv

This example will give only the out-gridview window:

.\test-paths.ps1 –noexport

Here are a couple of examples with the script in action. In this first one I will get all failed status results for the test-path commands, but that is because I am using simulated directory paths.

Here are the contents of the paths.ini file which is collocated with the script:

Figure 1: Contents of Paths.ini File

Here are a few screen shots of the utility being run, and some of the selected output screen shots.

.\test-paths.ps1

Figure 2: Command Window Output

You can see that the Powershell command window echoes the target currently being tested.

Since the above example did not use either the of the two exclusion switches, both out-gridview and a CSV file were generated. Here are images of both types of output:

Figure 3: Out-gridview

Figure 4: Testpathresult.CSV File

Notice there are two columns in Figure 3: Accessible and HomeDirPath. In each of these the path tested was shown as False because the path was not found.

Here is another example, but this one excludes the export to the CSV file.

.\test-paths.ps1 –noexport

I added “c:windows” to the paths.ini file to show that the test-path can actually find a valid path. With this one we still see the out-gridview window, but no CSV file is generated. Notice that now we have a True in the Accessible column.

Figure 5: True Path Now Found

And finally, the last example where an alternate output file name is generated using the –outfile parameter:

.\test-paths.ps1 –outfile february28th.csv -nogridview

With this one no out-gridview window is generated, but the output file is unique and will not be overwritten the next time the utility is run.

Figure 6: Alternate Output File Naming

In summary, this utility provides an easy way to test a few, or thousands of network paths very easily.

It is run in a Windows Powershell environment. The target paths are inserted in the paths.ini text file, and the command is run as detailed above.

Let me know if you have any questions about this.

Thanks

Patrick Parkison

Below is the code used in the test-paths.ps1 script.

###################################################################################

<#

.Patrick Parkison

pp1071@att.com

.SYNOPSIS

This script will test the validity of paths that are contained in the paths.ini file. Output is generated to a CSV file, and to Out-GridView.

.DESCRIPTION

The targets of the test-path command are pulled from the “paths.ini” file that is co-located with the test-paths.ps1 file.

Each target is tested using the Powershell test-path commandlette. Results are stored along with the path name in two output methods.

out-gridview and filename.csv

.PARAMETER

-nogridview: Prevents the script from generating the Out-GridView window.

-noexport: Prevents the script from generating the exported CSV file.

-outfile: Use an alternative name for the output file. CSV extension is best. The default if this switch is not added is testpathresult.csv

.EXAMPLES

This will give two outputs. A file named testpathresult.csv and the out-gridview window:

.\test-paths.ps1

This example will give no out-gridview window, but will save a CSV file named patrick.csv:

.\test-paths.ps1 -nogridview -outfile patricks.csv

This example will give only the out-gridview window:

.\test-paths.ps1 -noexport

#>

param([switch] $noGridview, [switch] $noExport, [string]$outfile = “testpathresult.csv”)

#Change the title bar of the script window. This is helpful for long running scripts.

$Host.UI.RawUI.WindowTitle = “Running test-path utility.”

#Makes an array, or a collection to hold all the object of the same fields.

$dataColl = @()

#Get location of the script. Info will be used for getting location of all test targetrs, and for saving output to the same folder.

function Get-ScriptPath

{

Split-Path $myInvocation.ScriptName

}

#ScriptPath will be used to place the output file.

$scriptPath = get-scriptpath

#Paths.ini is a text file containing a list of targets e.g. \servernamesharename

$sourcefile = $scriptPath + “paths.ini”

<#

This is the output CSV file. It is overwritten each time the script is run.

If a historical record is desired, a date can be appended to the file name. See this reference on how to do that: https://thescriptlad.com/?s=date

#>

$outputfile = $scriptPath + “” + $outfile

foreach ($path in (gc $sourcefile)){

$dataObject = New-Object PSObject

Write-Host “Scanning: $path”

Add-Member -inputObject $dataObject -memberType NoteProperty -name “Accessible” -value (Test-Path $path )

Add-Member -inputObject $dataObject -memberType NoteProperty -name “HomeDirPath” -value $path

$dataColl += $dataObject

}

#This section is used to generate the out-gridview display.

if (!$noGridview)

{

$label = “Test-Path Results. Total Responses: ” + $dataColl.count

$dataColl | Out-GridView -Title $label

}

#Output to the CSV file for use in Excel.

if (!$noExport)

{

$dataColl | Export-Csv -noTypeInformation -path $outputfile

}

#Restore the default command window title bar.

$Host.UI.RawUI.WindowTitle = $(get-location)